Setup Commands
Introduction
To connect to any device, one needs a unique combination of IP address (which identifies the device) and port number (which specifies the service).
This package typically deals with two types of network interfaces:
1 GbE public interface - Accessible from anywhere on the network. Connectivity can be verified by pinging this interface from any PC.
10 GbE private interface - Dedicated to high-speed data transfer with a specific PC. In addition to the 1 GbE public interface (MTU 1500), the device may include one or more private 10 GbE interfaces (MTU 9000), which are not accessible from other machines.
Client to Module
Client Module TCP Commands
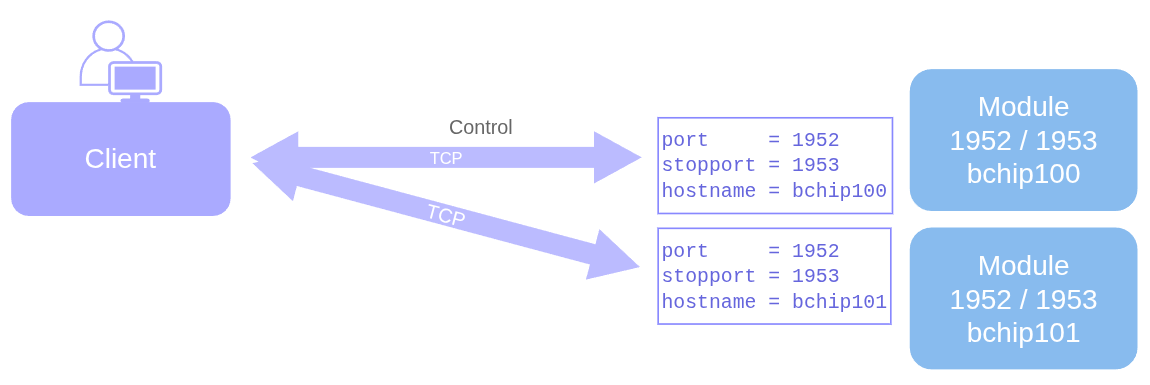
The client configures and controls modules via the 1 GbE public TCP interface.
Should be able to ping the module’s hostname from any PC on the network.
If one cannot ping, ensure that it is powered on.
If the command cannot connect to the port (hostname command failed), the onboard servers may not have started yet.
Each physical module has its own unique IP address. As the IPs are already different, all modules can share the same default ports:
1952 - Default Module TCP Control Port
1953 - Default Module TCP Stop port
# Therefore, one can use
hostname bchip100+bchip101+
# instead of
hostname bchip100:1952+bchip101:1954+
Simulators, however, usually run on the same PC. See virtual servers for more details. In that case, each instance must use a different port. By incrementing port numbers, you can also use the virtual command for convenience.
# Therefore, one can use
virtual 2 1952
# instead of
hostname localhost:1952+localhost:1954+
Client to Receiver
Client Receiver TCP Commands
Each module has a receiver, which can be either local or remote.
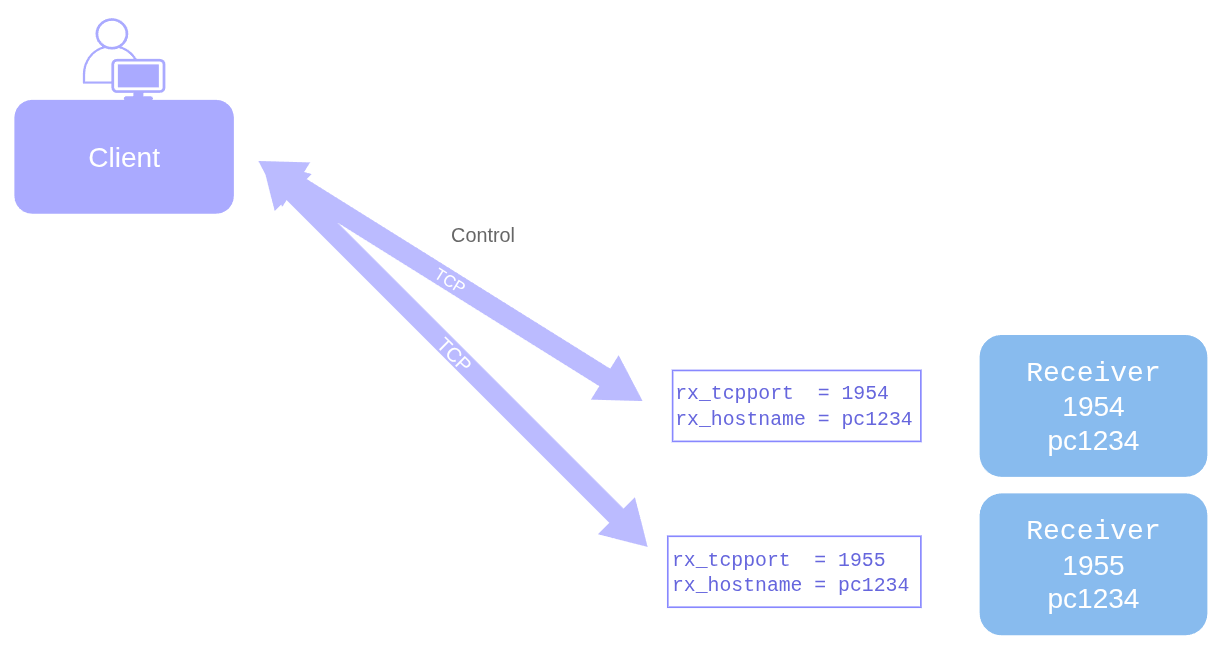
The client can configure and control receivers via the 1 GbE public TCP interface:
Should be able to ping the receiver’s hostname from any PC on the network.
If one cannot ping, ensure that it is powered on.
If the command cannot connect to the port (rx_hostname command failed), the receivers may not have started yet.
Since multiple receiver processes typically run on the same PC, they share the same IP. Here, each receiver process must use a different TCP port for a unique connection.
1954 - Default Receiver TCP port
Configuring the receiver with the command rx_hostname command, sets up a receiver for every module in shared memory automatically ie. every module’s receiver TCP port will automatically increment in shared memory. The starting port is defined by the command rx_tcpport with the default being 1954.
A multi-module command (without colon or module index) sets incremental ports starting from the specified port number.
hostname bchip100+bchip101+bchip102+bchip103+
rx_tcport 2000 # sets the receiver port to 2000, 2001, 2002, 2003
For example, using default TCP ports (1954, 1955):
hostname bchip100+bchip101+
rx_hostname localhost
# Equivalent to:
rx_hostname localhost:1954+localhost:1955+

# or set to another set of ports (automatically incremented)
rx_tcpport 1984
rx_hostname localhost
# instead of
rx_hostname localhost:1984+localhost:1985+
Module to Receiver
Module Receiver UDP Commands
10GbE Interface
The module typically sends images to the receiver via a 10 GbE private interface on the receiver PC, which has an MTU of 9000 to support jumbo packets. The private interface is not reachable from other machines, so it cannot be pinged from anywhere.
Multiple UDP Packets
Images are split into UDP packets for transmission. Unlike TCP, UDP is connectionless and does not guarantee delivery. Therefore, the receiver PC must be tuned for reliable reception. See Troubleshooting.
UDP Configuration
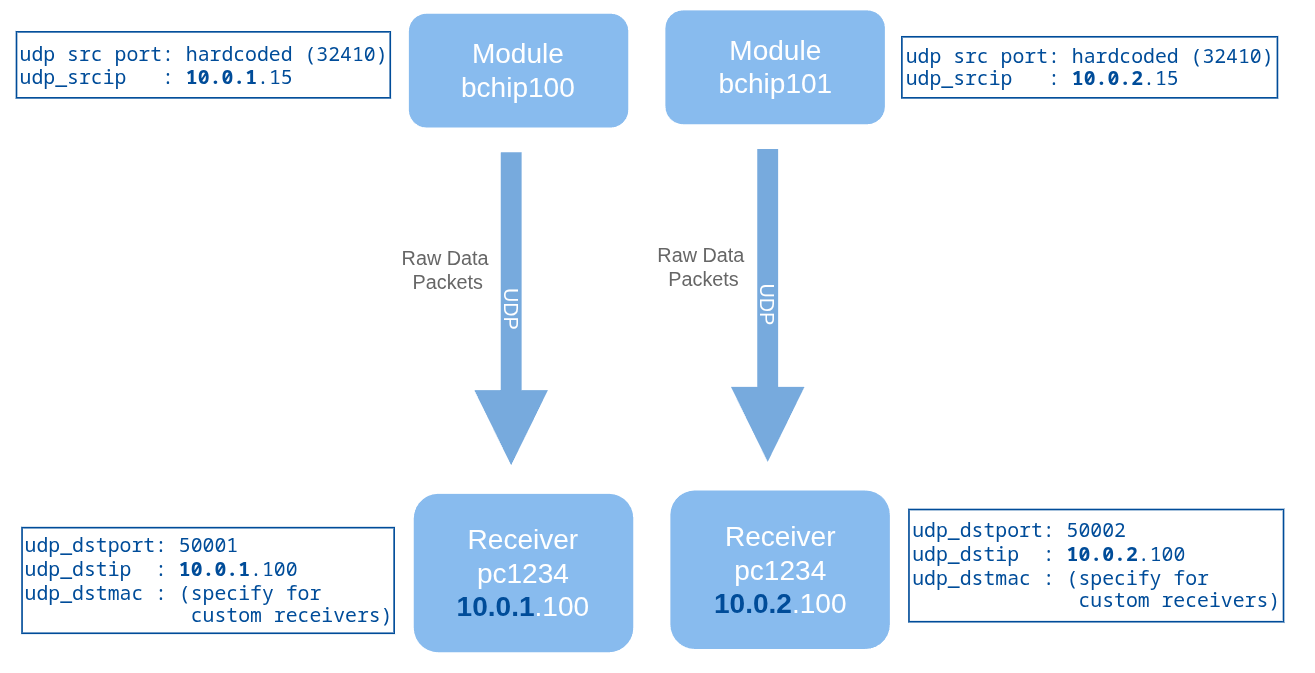
Unlike TCP, the module (hardware) requires explicit configuration for sending images via UDP, including:
Source and destination IPs
Source and destination MAC addresses
Source and destination ports
UDP Destination
Info on where to send the image from the module to.
UDP Desination IP - The IP of the receiver PC’s 10 GbE interface, usually found via ifconfig. Command: udp_dstip. For 1GbE interface and for this command, one can use ‘auto’ as an argument, which will pick up the IP from the rx_hostname command.
UDP desintation MAC - Also obtained from the interface using ifconfig. For built-in receivers, the module configures this automatically from the UDP destination IP. For custom receivers, it must be explicitly provided. Command: udp_dstmac
UDP destination port - Ensure uniqueness if multiple users share the interface. Command: udp_dstport
50001 - Default Receiver UDP port
UDP Source
As it is a one-way communication (module to receiver with no reply or acknowledgements), info on the source of the image is more for debugging purposes and prevent packet rejection.
UDP source IP - Must be on the same subnet as the destination IP (same first three octets) to prevent packet rejection by the receiver interface. For 1GbE interface and for this command (except for Eiger), one can use auto as an argument, which will pick up the IP from the hostname command. Command: udp_srcip
# 10 GbE interface
hostname bchip100
udp_dstip 10.0.2.1
udp_srcip 10.0.2.19
rx_hostname localhost

# 1 GbE interface
hostname bchip100
rx_hostname localhost
udp_dstip auto # this command uses IP from rx_hostname. So, it comes after.
udp_srcip auto # this command uses IP from hostname
UDP source MAC - By default, it is set to aa:bb:cc:dd:xx:yy where xx and yy are module row and column indices to differentiate the modules while debugging. Command: udp_srcmac
UDP source port - This is hardcoded in every module to the same value in the detector server and cannot be changed.
Note: If there is a second UDP port on the module, use ‘udp_dstport2’ or ‘udp_dstip2’etc. See here for more detector specific info.
Receiver to GUI
Receiver GUI Commands
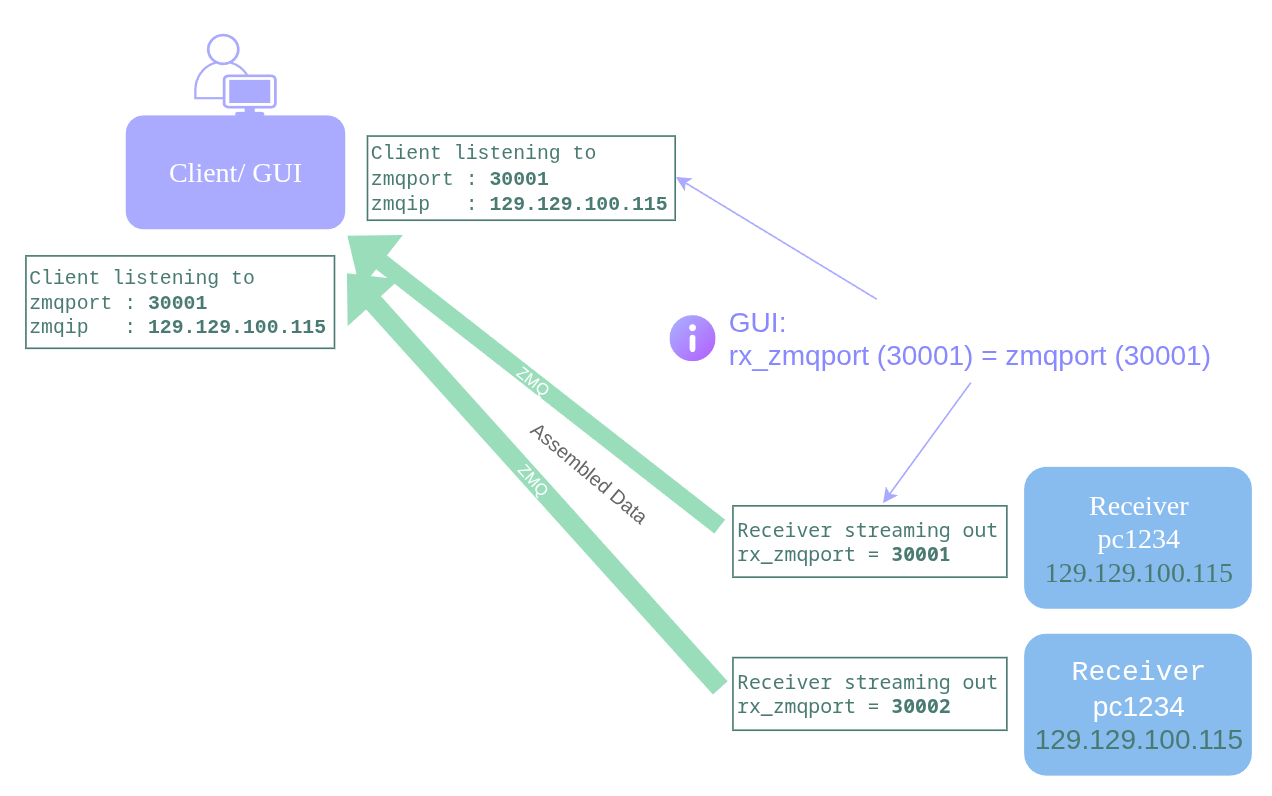
Enabling the GUI automatically streams images from the receiver via ZMQ sockets. Even without the GUI, streaming can be activated explicitly using the command rx_zmqstream. ZMQ streaming uses TCP/IP, so the ports must be configured appropriately.
Receiver ZMQ Port - Port from which the receiver streams ZMQ packets. Command: rx_zmqport
30001 - Default Receiver ZMQ Port (stream out from)
Client ZMQ Port - Port that the client ZMQ socket listens to. Command: zmqport
30001 - Default Client ZMQ Port (listens to)
Client ZMQ IP - IP address the client ZMQ socket listens to. Command: zmqip. By default, this is set to the IP of rx_hostname, but can be set to any IP address that the client can reach.
Default: Receiver’s hostname (rx_hostname)
Note
zmqport and zmqip need to be set up in shared memory before starting up the Gui. If the Gui is already running, change it in the Advanced Tab directly in the Gui.
rx_zmqstream is set to 1 when the GUI is started, but has to be manually set back to 0 to disable zmq streaming in the receiver for better performance when not using the Gui.
The GUI hwm (high water mark, which is like a measurement of the number of enqueued zmq packets) values are set to a low number (from library default of possibly 1000 to 2) to reduce the zmq buffer to display only some of the images. Resetting it back to -1 or 1000 should only matter if one plans to not use the Gui and still zmq stream without wanting to drop zmq images (eg. for external processing chain).
Receiver to External Processing
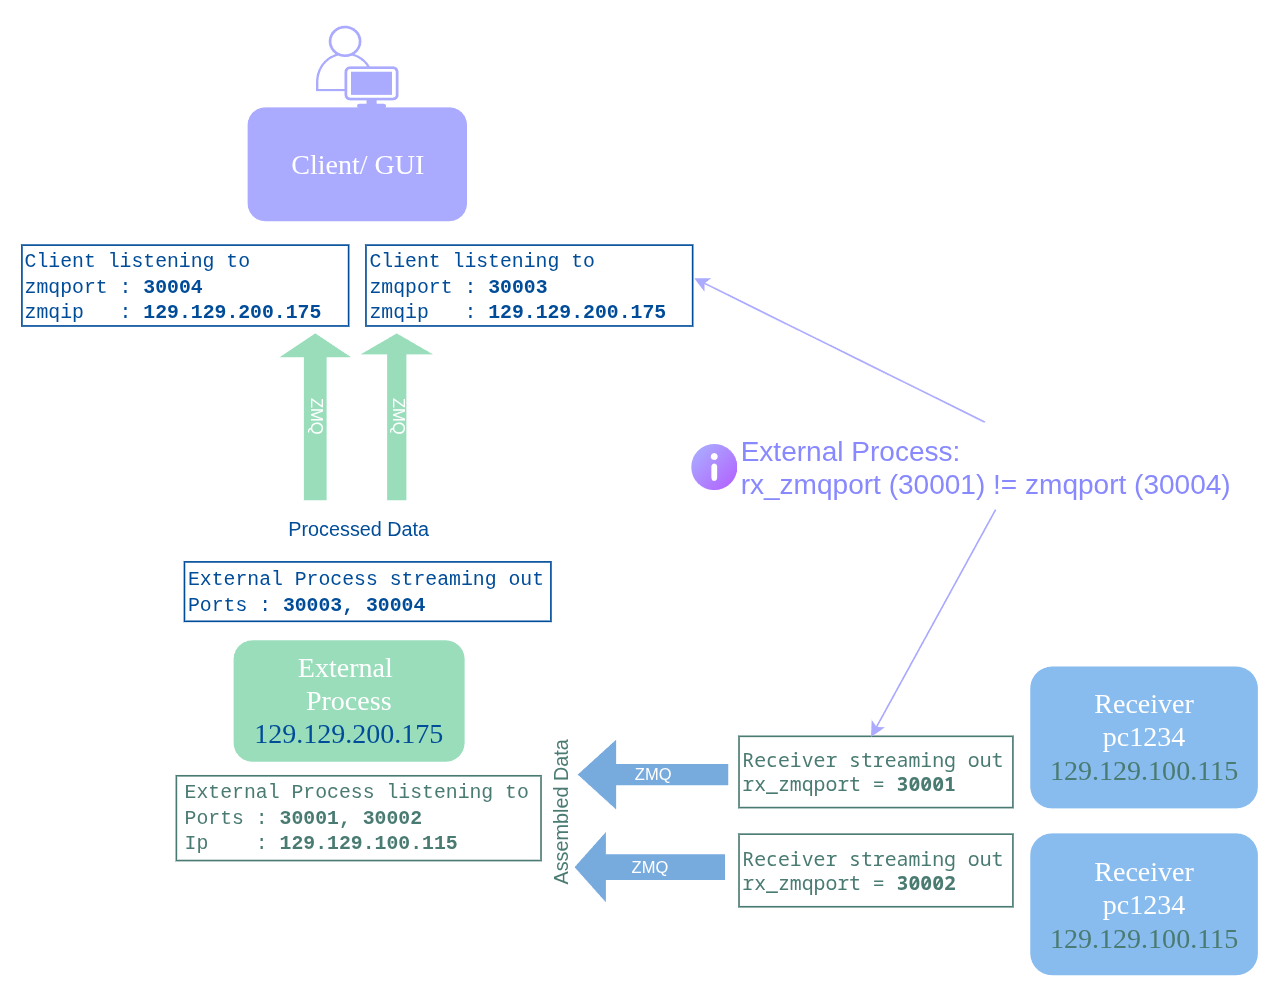
Receiver External Process Commands
Images from the receiver can also be streamed to an external processing chain for further processing or storage. In this setup:
The external processor listens to the ZMQ ports and IPs that the receiver streams from.
The client ZMQ sockets now listen to the ports and IPs that the external processor streams from instead of the receiver.
Receiver ZMQ Port - Port from which the receiver streams ZMQ packets. Command: rx_zmqport
30001 - Default Receiver ZMQ Port (stream out from)
Client ZMQ Port - Port that the client ZMQ socket listens to. Command: zmqport. In this set up, it should listen to the zmq port that the external process is streaming out from.
30001 - Default Client ZMQ Port (listens to)
Client ZMQ IP - IP address the client ZMQ socket listens to. Command: zmqip. By default, this is set to the IP of rx_hostname, but in this set up, it should listen to the zmq IP that the external process is streaming out from.
Default: Receiver’s hostname (rx_hostname)